If you have a solid understanding of smart glass and the various technologies available to glass installers, it’s time to start looking at more practical information that relates to how to install smart glass. In this article we explore some of the top points to consider when installing smart glass, including analyzing typical technical and wiring diagrams, as well as taking an in-depth look at steps in the installation process, such as handling, inspection, prepping surfaces, setting and more. Whether you’re getting your first requests for smart glass and want to start offering it to your clients, or if you’re looking to brush up your knowledge on some of the latest tips and best practices in the industry, this article will assist on your smart glass installation journey.
The most important thing to note is that installing smart glass is less scary than you might think, as you’ll see from the following sections. With just a little bit of know-how and practice, you’ll be well on your way to perfecting the install process. If you do run into any questions or concerns however, you can always reach out to the smart glass manufacturer so long as they offer technical support. If you’re working with Gauzy, you can reach our global services team at support@gauzy.com for technical support at any time.
Please note: if you are involved in installing smart glass, the information in this guide is intended for high level informational purposes only and does not act as a technical instruction manual. Exact installation information may vary depending on different smart glass product types, applications and manufacturers. Please contact your manufacturer for official instruction documentation that you may require prior to actual installation. If you are working with Gauzy, official installation guidelines are available by contacting our support team.
How to Install Smart Glass: Top Points to Consider for Glass Installers
- Smart Glass Technical Diagrams – learn how to understand a typical smart glass technical diagram
- Smart Glass Handling – discover some top tips when it comes to delivering, storing and handling smart glass
- Inspection – know what to look out for once smart glass has arrived on site and prior to installation
- Prepare Surfaces, Materials and the Site – examine the area where the smart glass will be installed and learn what to look out for
- Setting – become proficient in the setting process, including how to properly position setting blocks
- Protection – take note of these additional factors to ensure the glass remains protected directly after the install process and well into its shelf life
- Cleaning – get more insight into the recommended cleaning protocol for smart glass, so you can ensure your clients remain informed and content with their installation.
- Choosing A Smart Glass Supplier – partner with a smart glass supplier with the experience and know-how to work with you on your project as a true collaborator.
Smart Glass Technical Diagrams
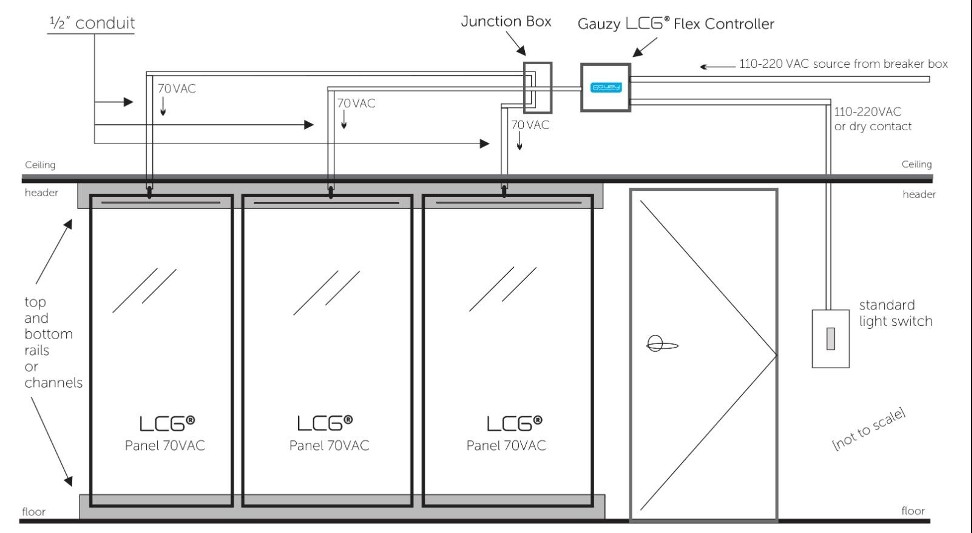
Glass installers are no strangers to technical diagrams – it’s likely you’ve come across a variety of different diagrams when installing regular glass. Smart glass is very similar. In this initial section, we’ll examine a typical smart glass technical diagram so that when you see it in the field, you’re familiar with some of the key components. Take a look at Figure 1 as an example – it shows you on a high level how smart glass connects to a building’s power supply and a Gauzy or standard switch. This will give you a quick overview of how the technology works and how it integrates within a typical building after you have installed the glass. While glass installers won’t be directly required to connect the smart glass to the power supply (leave that for the electrician!), it pays to know how the wiring setup works. You’ll mainly only be responsible for ensuring the glass is positioned accordingly so that the appropriate wiring is accessible for connection by the electrician when they’re on-site.
As you can see in Figure 1, there are three panels of LCG® smart glass adjacent to a door and a light switch. This diagram could depict a typical interior wall partition in an office, hotel or residence for instance. You can see that the LCG® panels connect to the building’s power supply in either the header or footer rails. Note, in Figure 1 the wiring is piping through the header rail. First, the wiring runs through the junction box, then it runs through Gauzy’s LCG® Flex Controller and then finally to the light switch. It’s important to note here that whether or not the smart glass wirings run through a controller or a transformer depends on the manufacturer. For instance, Gauzy is the only smart glass manufacturer that operates through a controller (you can learn more about controllers and their benefits on Gauzy’s website). This is just one example of a typical diagram that might be used in the installation process. An electrician is required to connect the controller to the mainline. If the smart glass is operated at low voltage (42VAC), an electrician is not required on site to connect glass to the controller. If the glass is operating at 70VAC, an electrician will need to connect the glass to the controller.
Smart Glass Handling
One of the first areas for discussion is how you handle the glass prior to, and during, the installation process. In this section, we look at how best to deliver, store, handle smart glass, all key factors in ensuring the technology functions to the best of its ability.
Smart glass, like regular glass, is a delicate material that needs to be stored and handled with care. You’ll want to ensure you comply with any manufacturer recommendations relating to storing and handling smart glass technology, as they’ll likely differ between suppliers and product types. You can view detailed recommendations for handling smart glass in your manufacturer’s specification sheet. Gauzy’s specification sheet, specifically in Section 088000 relevant to glass installers, is downloadable on our website or through contacting your representative.
As mentioned above, you’ll want to follow strict glass handling and storage recommendations as outlined by the manufacturer. Some of the recommendations you might come across could include:
- Once the smart glass has arrived at its final destination, it’s important to lift the glass out of the crate as carefully as possible. Make a note not to slide it out, as this can damage the technology.
- When resting the glass, make sure to avoid resting it on an un-cushioned surface. Any abrasive surfaces that have sharp or jutting edges can damage the smart glass technology and hinder its performance.
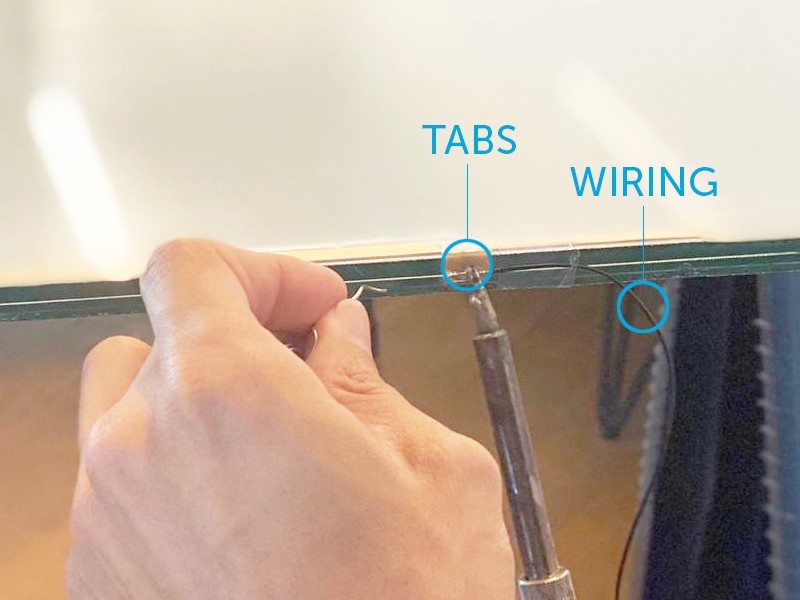
- Smart glass connects to the building’s power supply using electricity, so there will be electrical wiring to take into account. It’s important not to lift or handle the glass by its electrical connectors or wires, as you might risk damaging the product.
- If wires and copper tabs from the glass are not taped down, consider taping them to the glass to ensure they do not get caught on anything and tear.
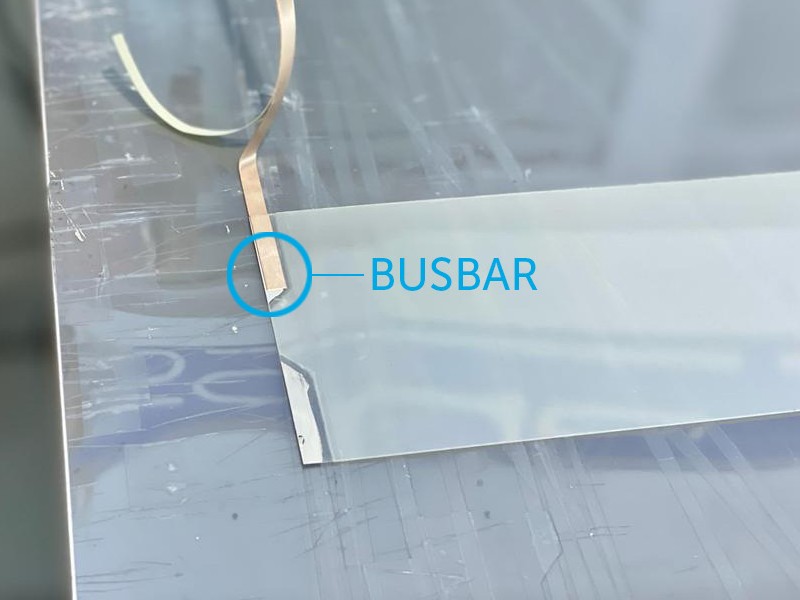
Lastly, don’t allow glass edges to come in contact with the frame or other conductive surfaces as this can also damage the product.
These insights are just a few of the types of factors you’ll want to consider when handling smart glass prior to installation. With proper maintenance and care in the handling process, the expected life of smart glass is in excess of 10 years, making it an extremely durable and long-lasting privacy and shading solution. It pays to know how best to handle the technology to ensure it reaches its designated lifespan.
Inspection
Now that the smart glass has been delivered and unpacked, it’s time to inspect each PDLC panel prior to the start of installation. There are a variety of factors to look out for in this inspection process that should be addressed prior to installation, including but not limited to:
- Size & Quantity: You’ll want to check that the shipped PDLC panels at the final destination do indeed match the quantity and size that was specified in the building’s plans. Any discrepancies should be highlighted and resolved at this critical point.
- Edges/Scratches: are the edges free from damage? Are there any scratches on the panel itself? This is the time to identify and ensure there are no abrasions or defects in any manner on any part of the PDLC panel or its edges. If you do notice anything, you’ll want to document it and contact your manufacturer.
- Labels: lastly, you should avoid removing any manufacturer’s labels on the PDLC panel without the architect’s approval first. These labels can contain information that may be used by other parties in the installation process so they’re valuable to keep intact. Moreover, you should not add other labels to the glass before checking if this may impact the film in any way.
Inspecting the smart glass once it arrives is a step that requires attention to detail, as well as knowing what to look out for. Taking a short moment to check for sizing requirements, edges and scratches, as well as labeling prior to install ensures the quality of the smart glass remains at its highest standard and all parties involved in the project, especially the end user, will be left completely satisfied with the project.
Prepare Surfaces, Materials and the Site
Now that you’ve inspected the glass, the next step is to examine the area where the smart glass will be installed. This is a key moment in the installation process as any detrimental conditions to the surfaces, material or the site must be corrected prior to beginning work to avoid delays or technical faults with the product later on. Here are some details you typically want to keep in mind during the preparation step:
Conduct a pre installation site survey, to assess the installation environment conditions are adequate and all relevant materials are present. Ensure frame and profile types and thickness are correct and that there are an adequate number of available electricity points. Take a moment to evaluate any special infrastructural needs and constraints for individual projects, as these always vary.
Wipe down all surfaces immediately before you begin applying the primer and glazing compound for glazing work, or tape for electrical work.
Check the silicone that you’re using. When installing smart glass you typically want to use only neutral-cure silicones, not acetic silicones. Your smart glass manufacturer should provide you with a list of verified sealants. Only use those specified or you will damage your glass.
Clean glazing channels, stops and rabbets to ensure there are no abrasive materials that might impact the installation process, including:
Make a note to remove any obstructions and substances which might interfere with your work, including protective coatings that could potentially fall into the adhesion materials or interfere with the sealant’s ability to bond.
Conduct a final wipe down of all surfaces immediately prior to applying glazing compounds or tapes. Check that you’re complying with the manufacturer’s instructions here as they do differ.
While they might seem small, taking into account these simple actions such as wiping down all surfaces and checking materials like silicones, are all parts of the installation process that you don’t want to miss.
Setting
You’ve unpacked, inspected and prepared all surfaces, now the time has come for the most exciting part – installing the smart glass. Here, setting the smart glass properly is another important consideration to ensure the overall quality of the product and finish of the project adheres to the client’s specifications. Here are some examples of items that typically come up in the setting process:
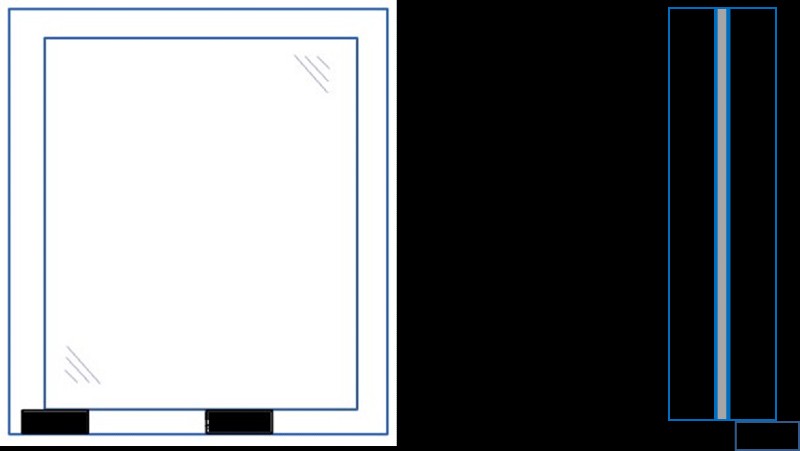
In figure 1, you can find a drawing that summarizes the correct usage and placement of setting blocks including points such as:
- Setting blocks are placed at a quarter point of the glass
- Minimum length of the setting blocks is 100mm
- Minimum distance is 150mm from glass corner
Setting Blocks – You’ll want to locate sill setting blocks of standard width and thickness at quarter points of all glass lights unless otherwise recommended by the manufacturer or supplier.

It is very important to make sure that once the glass is placed on the setting blocks, the setting blocks are well positioned and will not be able to shift outward\inward in the frame. This will prevent the glass from partially resting on the setting blocks.
Some other factors in terms of sill setting blocks could include:
- Use blocks of proper durometer, size and thickness to support the glass in accordance with the manufacturer’s recommendations. If the glass being installed is >4 sqm, the setting block size should increase by 25mm per sqm.
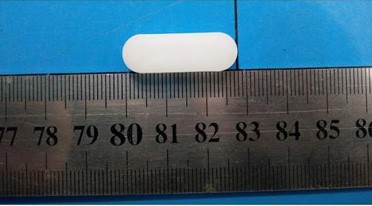
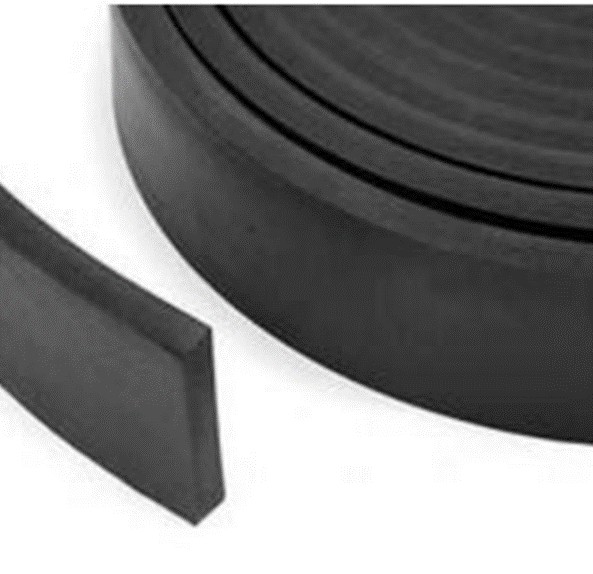

Figure 4: Examples of Setting Blocks, Neoprine (left), and Rubber (right)
Glass lap and edge clearances must be provided according to pertinent codes and standards of manufacturers.
You’ll want to ensure you set glass in a way that produces the greatest possible degree of uniformity in appearance. To do this, you should take things into account such as:
- Glass installation in dynamic frames such as operable windows and sliding doors must meet architectural specifications outlined by the manufacturer, such as in section 088000 of Guazy’s specification sheet.
- Glazing to the exterior and wet interior conditions must be wet-sealed and not allow moisture through with provisions to allow for weeping of condensation that may infiltrate the system.
- Butt joint glazing is possible – butt joint glazing is a glass installation method without a vertical panel. In this instance, panels can be butt glazed using a minimum 7/16” thickness panel. It’s important to only use neutral cure silicones (791, 795, 995, 1199) when butt joint glazing. Do not use acetic silicones.
- Pressure glazing systems without positive positioning stops are not to be used with this glass.
- Place electrical connections properly, so that an electrician can access them. It’s important to note that only a certified electrician should connect the smart film and the controllers. Furthermore, all electrical work and installation should be performed according to any local regulations. Review Figures 5 & 6 below for a technical diagram showing the correct controller set up for direct voltage electricity connection as well as a dry contact connection.
- If you’re installing smart film or smart glass from Gauzy, you’ll need to place Gauzy’s controllers in a well ventilated place, not exposed to direct sunlight or any source of excessive heat, in order to ensure maximum product life span.
- Always remember to test each glass panel prior to installation.
- Electrical connections must exit at the head conditions of any framing system in wet environment applications.
- Cut and seal the joints of glazing gaskets in accordance with the manufacturers recommendations, provide watertight and airtight seals at corners and other locations where joints are required.
- Pay careful attention to silicone sealants; regular silicone sealants may contain plasticizers that can cause irreversible damage to the smart glass and delamination of the EVA. When adhesion or sealing of smart glass panels is needed, only neutral sealants suitable for use with laminated glass must be used. Review the figure below for sealants to consider.
- When placing laminated glass inside a metal frame, you should verify that there is no excessive pressure applied on the glass in order to avoid film delamination or glass deformation.
The importance of a proper setting procedure in the smart glass installation process is paramount. Keep these points in mind when completing the setting process and you’ll be well on your way to delivering a professional install of smart glass technology.
Protection
After installation you can take a well deserved break – the hardest part is over. But there are a variety of additional factors to keep in mind to ensure the glass remains protected directly after the install process and well into its life on the walls, door and windows of your clients’ projects. Smart glass is a highly durable and long-lasting product and it’s important you keep these points in mind to ensure its longevity and protect it in the long run. For instance:
- You can protect the smart glass from breakage after installation by attaching streamers of ribbons. Make sure these streamers or ribbons adhere to the framing and are held free from the glass.
- Conversely, you should not apply warning markings, streamers, ribbons or other items directly to the glass except as specifically allowed by the manufacturer as this can hinder the technology and its performance.
- Another important factor to note is windblown objects, welding sparks, or other material applied to the glass surface during construction may cause irreversible damage. Look out to see if other contractors will be on site and if so, perhaps let the project manager know that the smart glass should be protected for the duration of the construction.
Always check with your manufacturer for the latest guidelines around protection of smart glass technology prior to and after the installation.
Post Installation Cleaning & Maintenance
As an installer, you might be responsible for cleaning the glass directly after the installation, or your clients could ask you for cleaning guidelines, so it’s important you know some best practices in this area. The following information will provide you with a few core solid smart glass cleaning tips, such as:
- Prior to cleaning, you should inspect the installation to ensure the glazing is sealed and that the glass edges and electrical components are not exposed to moisture. Be sure to test each electrified LCG® smart glass unit and verify its performance and control switching. Correct any deficiencies here.
- Before cleaning the smart glass, always make sure that it is switched off and completely dry before it is turned on.
- It’s important to avoid spraying any cleaning solution directly onto the glass or film, instead always spray onto a cloth first before spot cleaning the affected area. This ensures that no penetration of liquid occurs under the film or within the glass rim, casket and profiles.
- For routine cleaning, we recommend using a conventional window washing solution, mild soap and water. Apply it with a soft, clean, grit-free cloth, then rinse glass and framing immediately with water and squeeze away excess moisture, then wipe the framing dry.
- Room temperature should be considered for optimum performance conditions and maintenance. Only clean glass while it is at room temperature. Don’t clean the glass when it is hot or in direct sunlight. Furthermore, always be weary not to expose the glass to extreme temperatures as this might result in thermal cracking of the glass.
- Ensure that no objects are leaning directly onto the glass and film.
- Stickers or glue should not be adhered to the glass.
- Make sure to leave cleaning and maintenance instructions for the end user!
As always, refer to each individual manufacturer for the latest recommendations in smart glass cleaning best practices.
Smart glass is a revolutionary technology that’s changing the built environment, and therefore, making its way into building specifications more frequently. Familiarizing yourself with the installation process is a key first step in your smart glass journey, and can provide a useful refresher to brush up on your smart glass knowledge if you’ve installed it many times before.
Choosing a Smart Glass Supplier
Whether you have worked with smart glass before, or this is your first installation, you want to partner with a smart glass supplier with the experience and know-how to work with you on your project as a true collaborator. Once you get the hang of it, installing smart glass is easy and rewarding.
The next time you have an inquiry from a customer for smart glass, you should go right to the source and choose Gauzy. We are there for you, from selection of product to final installation.
As you can see from the topics covered in this section, installing smart glass is a relatively easy and straightforward process that covers much the same things as regular glass.
All you have to do is contact a smart glass manufacturer to start the conversation, learn their best practices that relate to their individual technologies and product lines, and you’ll be installing smart glass perfectly and effortlessly in no time at all.
Want to learn more about Smart Glass or receive a quote? Contact the Smart Glass experts at Gauzy today.
FAQ
Questions and Answers
Smart glass installation typically requires basic glazing equipment, including suction cups, multimeters, wire strippers, and non-abrasive cleaning supplies. A compatible smart glass power supply or controller is essential. Installers should work in a clean, dust-free environment and follow all manufacturer handling guidelines.
Yes, smart film can be retrofitted onto existing glass surfaces, making it ideal for renovations. However, switchable laminated smart glass generally replaces the existing glass unit and must be installed into the window frame like a standard insulated glass unit (IGU).
Installation time varies by project but generally takes 30 minutes to 2 hours per panel. Additional time is required for smart glass wiring, functional testing, and curing when needed.
Smart glass panels require low-voltage electrical wiring to connect to a controller or power transformer. Each panel typically includes two leads that must be connected according to the manufacturer’s wiring diagram. Glaziers run the wires, and certified electricians complete the power connection.
Avoid these smart glass installation errors: damaging the film or interlayer, improper edge sealing, incorrect voltage, and contaminating the glass surface. Always install in a clean environment and follow product-specific protocols.
No. Smart glass is custom-manufactured to precise dimensions and cannot be cut, resized, or altered after production. Cutting an active panel will permanently damage its electro-optic functionality.
Smart glass requires minimal maintenance. Use a soft, lint-free cloth and a non-abrasive, ammonia-free glass cleaner. Avoid harsh chemicals and abrasive sponges to prevent surface damage.
Not exactly. Smart film is an adhesive retrofit product applied onto existing glass, while smart glass is a pre-laminated solution installed like standard glass. Both require careful handling and wiring but differ in application methods and installation steps.